contrary to popular opinion You do not need to learn manual

contrary to popular opinion You do not need to learn manual

Crown Graphic Manual Camera

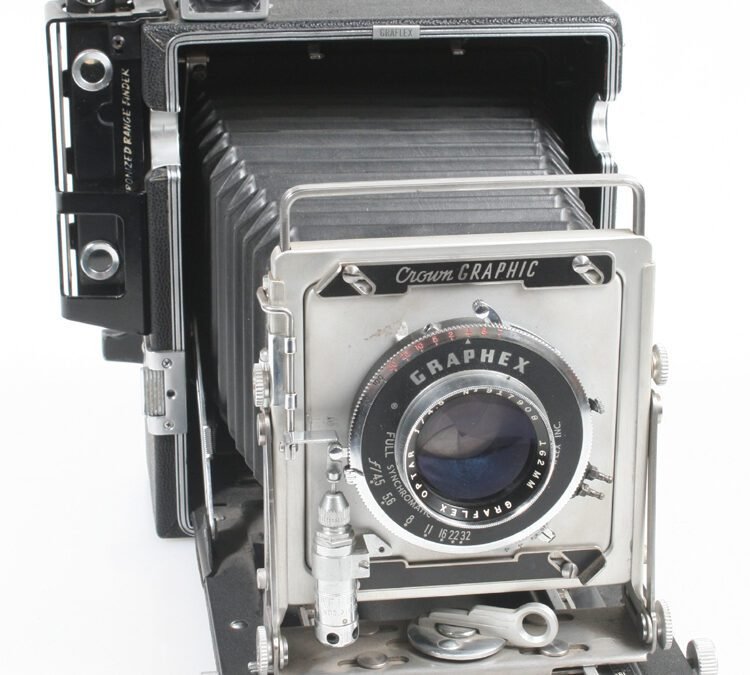
In 1970 this is the camera that I used to learn photography, and used at my first job as a photojournalist.

You don’t get much more manual than this.
Manual focus – by either using the range finder, or getting out the dark cloth and using a magnifying lass on the ground glass.

Manually using a separte light meter to pick the exposure.

Manually transfering those settings to the lens.

So when I say that you do not need to learn manual to create great photographs, I speak from a point of real experience with manual.

For the first 20 years manual exposure and manual focus is all I used.

But here’s the thing that nobody mentions: Manual cameras were designed to used manually. For example when I switched to my Nikon FTN I could change shutter and aperture without ever taking my eye from the viewfinder and the screens where large and bright.

Today’s digital cameras while they may have a manual mode are not really designed to be used manually. And why should they because

Besides a heavy tripod, you also need to use a separate hand held light meter, and if you followed Ansel Adams, you would meter

Using manual mode in photography can often create more challenges than it resolves, especially for beginners. Here are several reasons why relying solely on manual mode may not be the best approach:

Overwhelming Complexity for Beginners

Manual mode requires a comprehensive understanding of various settings, including ISO, aperture, and shutter speed. For those new to photography, this can be overwhelming and lead to frustration. Beginners might find themselves struggling to make quick adjustments while trying to capture spontaneous moments, resulting in missed opportunities or poorly exposed images[1][2].

Time-Consuming Adjustments

When shooting in manual mode, photographers must adjust settings for every shot, which can slow down the process significantly. This is particularly problematic in dynamic environments where lighting conditions change rapidly, such as outdoor scenes with varying sunlight. In these situations, using automatic or semi-automatic modes (like Aperture Priority) allows for quicker adjustments and more successful captures[2][4].

Risk of Poor Exposure

Without experience, photographers may frequently encounter issues with exposure. Manual mode does not automatically compensate for changing light conditions; thus, users may end up with a series of overexposed or underexposed images. In contrast, other modes can help manage exposure more effectively by allowing the camera to make adjustments based on real-time conditions[3][4].

Lack of Creative Control

While manual mode offers complete control over settings, this doesn’t necessarily translate to better creative outcomes. Many photographers find that using modes like Aperture Priority or Shutter Priority provides sufficient control while allowing them to focus on composition and creativity rather than technical adjustments. For instance, if a photographer is trying to capture fast-moving subjects, using Shutter Priority can ensure sharp images without the hassle of constant adjustments[2][4].

Conclusion

While manual mode has its place—particularly in controlled environments or specific types of photography like long exposures or astrophotography—it is not always the best choice for every situation. For many photographers, especially those still developing their skills, using automatic or semi-automatic modes can provide a more manageable and effective way to capture high-quality images without the stress of constant technical adjustments[1][5].

Citations:
[1] https://www.digitalphotomentor.com/real-photographers-only-shoot-manual-mode/
[2] https://www.mikesmithphotography.com/blogindex/camera-modes-why-manual-mode-isnt-the-best-option-for-you
[3] https://www.youtube.com/watch?v=ZC3NWJGnE9U
[4] https://digital-photography-school.com/myth-reality-shooting-manual-mode/
[5] https://www.lightroompresets.com/blogs/pretty-presets-blog/17796936-7-days-to-mastering-manual-mode-why-shoot-in-manual-mode
[6] https://www.reddit.com/r/photography/comments/19c2n5f/i_just_cant_use_manual_mode_am_i_missing/
[7] https://www.athomewithkids.com/common-manual-mode-mistakes-most-photographers-make/
[8] https://www.photo.net/forums/topic/467691-manual-mode-problems/

Why aperture priority is better than manual

Aperture priority mode (often denoted as “A” or “Av” on cameras) offers several advantages over manual mode, making it a preferred choice for many photographers. Here are the key reasons why aperture priority is often considered better:

1. Speed and Efficiency

Aperture priority mode allows photographers to set their desired aperture while the camera automatically adjusts the shutter speed for optimal exposure. This significantly speeds up the shooting process, especially in changing light conditions, as photographers can focus on composition rather than constantly adjusting settings[1][2]. In contrast, manual mode requires adjustments to both aperture and shutter speed, which can slow down shooting.

2. Consistent Exposure

In situations with fluctuating light, aperture priority helps maintain consistent exposure across a series of shots. The camera automatically compensates for changes in light, reducing the risk of over- or under-exposure that can occur when manually adjusting settings[2][3]. This is particularly useful in dynamic environments like weddings or wildlife photography.

3. Creative Control

While providing automatic shutter speed adjustments, aperture priority still grants full control over the aperture setting, which is crucial for achieving desired depth of field effects. Photographers can easily create a blurred background or ensure sharpness throughout the image without worrying about shutter speed adjustments[1][4]. This balance allows for creative experimentation while maintaining technical accuracy.

4. Learning Tool for Beginners

Aperture priority serves as an excellent bridge between automatic and manual modes for beginners. It allows them to learn how different apertures affect exposure and depth of field without the overwhelming complexity of managing all settings manually[4][5]. This hands-on experience can build confidence before transitioning to full manual control.

5. Simplified Adjustments

With aperture priority, exposure compensation can be easily adjusted with a single dial if needed. This flexibility allows photographers to quickly adapt to specific lighting conditions without losing focus on their subject[2][3]. In manual mode, adjusting exposure typically involves more steps and can distract from the creative process.

In summary, aperture priority mode combines speed, consistency, and creative control, making it a versatile option for photographers at all skill levels. It simplifies the shooting process while still allowing for significant artistic expression, which is often why it is favored over manual mode in many scenarios.

Citations:
[1] https://photographylife.com/aperture-priority-mode
[2] https://digital-photography-school.com/aperture-priority-over-manual-mode/
[3] https://www.lightstalking.com/aperture-priority-most-preferred-shooting-mode-by-photographers/
[4] https://expertphotography.com/how-when-to-use-aperture-priority-mode/
[5] https://fstoppers.com/education/benefits-aperture-priority-mode-602663
[6] https://www.youtube.com/watch?v=pLIsDjx553M
[7] https://www.mikesmithphotography.com/blogindex/camera-modes-why-manual-mode-isnt-the-best-option-for-you
[8] https://www.reddit.com/r/AskPhotography/comments/pz6e20/help_me_understand_when_to_use_shutter_vs/

Storm clouds gathering on the horizon near Lethbridge

Storm clouds gathering on the horizon near Lethbridge

I have no idea what these wheels are. I am guessing they are supposed to be wheels of a steam engine, but while they are located right behind the Galt Museum, there is nothing that I could find on the museum site, or by any other search that even mentions the wheels. A few photos, but mostly just mentioning the High Level Bridge in the background.


Storm clouds on the horizon


I am guessing that they are supposed to represent the drive wheels of a steam engine, but because of the size, I doubt they ever where on a real engine.


What I can tell you, the wheels are not from this steam locomotive. This little guy is part of the Airdrie Train Park which has several different tracks and engines that you can ride on.


Steam train locomotive located behind the old train station in Lethbridge.


This one located behind the health unit in the old train station is a little easier to find information on because there is a plaque that details the history of Locomotive 3651, a oil fired steam locomotive.


Now we move from Lethbridge to Coutts, where we have the Coutts train station on it’s original site but boarded up in preparation for it’s move to the Galt Railway Museum in Stirling.


Coutts Train station on its original foundation before being moved to Stirling


They made it to Milk River and brought it up and around the hospital


The move also required the use of the utility companies to either lift lines over the roof, or to actually take them down and other crews were required to remove other road side obsticals such as road signs


You have to give this recipe for Banana Pecan Muffin Recipe a try

You have to give this recipe for Banana Pecan Muffin Recipe a try

Banana Pecan Chocolate Chip Muffin

If you’re a fan of muffins, you’re in for a treat with this recipe for Banana Pecan Chocolate Chip Muffins with Streusel Topping. These moist and flavorful muffins are the perfect combination of sweet bananas, crunchy pecans, and rich chocolate chips. The added streusel topping adds a delightful crunch and extra sweetness.

Ingredients:

  • 2 cups all-purpose flour
  • 1 teaspoon baking soda
  • 1/2 teaspoon salt
  • 1/2 cup unsalted butter, softened
  • 3/4 cup granulated sugar
  • 2 large ripe bananas, mashed
  • 2 large eggs
  • 1 teaspoon vanilla extract
  • 1 cup chopped pecans
  • 1 cup chocolate chips

Instructions:

  1. Preheat your oven to 350°F (175°C) and line a muffin tin with paper liners.
  2. In a medium bowl, whisk together the flour, baking soda, and salt.
  3. In a separate large bowl, cream together the softened butter and sugar until light and fluffy.
  4. Add the mashed bananas, eggs, and vanilla extract to the butter mixture, and mix well.
  5. Gradually add the dry ingredients to the wet ingredients, mixing until just combined.
  6. Gently fold in the chopped pecans and chocolate chips.
  7. Spoon the batter into the prepared muffin tin, filling each cup about 3/4 full.
  8. In a small bowl, mix together the streusel topping ingredients:
    • 1/4 cup all-purpose flour
    • 1/4 cup granulated sugar
    • 2 tablespoons unsalted butter, melted
    • 1/4 cup chopped pecans
  9. Sprinkle the streusel topping over each muffin.
  10. Bake for 18-20 minutes, or until a toothpick inserted into the center comes out clean.
  11. Allow the muffins to cool in the tin for 5 minutes, then transfer them to a wire rack to cool completely.

These Banana Pecan Chocolate Chip Muffins with Streusel Topping are perfect for breakfast, brunch, or as a sweet treat any time of the day. Enjoy!